Pocket carry in a thobe
How I carry my CCW in a long kurta
This post is about deploying a Highly Available Ghost CMS using DevOps practices on AWS - its both a deep-dive into the different AWS DevOps services, and a tutorial to follow to get a working, highly available Ghost blog running on AWS ECS deployed through a CI/CD pipeline.
Ghost is one of the most popular CMS and blog platforms, rated 2nd on GitHub, and the biggest open source headless CMS project. Ghost is an open source Node.js JAMstack implementation, and can be used headless, or with the built-in editor. Ghost can be self-hosted in different forms: installed using the ghost CLI, or using a docker container.
This post is about deploying a Highly Available Ghost CMS using DevOps practices on AWS - its both a deep-dive into the different AWS DevOps services, and a tutorial to follow to get a working, highly available Ghost blog running on AWS ECS deployed through a CI/CD pipeline. It will include details on each service, how to integrate the different services togethers, using different methods: the cli, and the CDK. The code can be found on my github repo.
This post does not include any screenshots of the AWS Console, to avoid potentially out-dated content as the console updates over time.
In my previous role, I wrote about how we built an API ecosystem that included a CI/CD pipeline. That pipeline was made up of various DevOps tools:
This resulted in a mixed bag of different tooling, each with different mechanisms for hosting, payment models, authentication, and logging. It was not very easy to orchestrate into a single cohesive unit. But thats exactly what AWS offers - a single place to consume multiple distinct services, with the ability to combine them together to solve a business problem. So in this tutorial we are going to leverage of only AWS native fully managed services, so you don’t need to provision, manage, and scale your own servers.
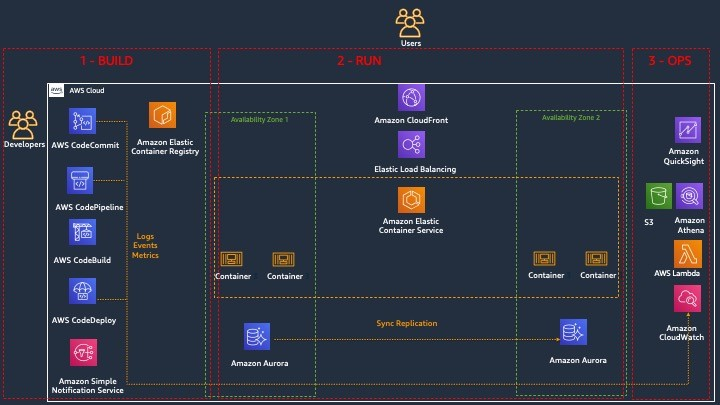
We are going to build an AWS environment, using various AWS DevOps tools, that will allow developers to push code or new Ghost content to a git repo (CodeCommit), which will kick off a pipeline (CodePipeline) to build (CodeBuild) the code in a container, store the image in a container repo (ECR), and do a blue/green deploy (CodeDeploy) of the new image to a container orchestration system (ECS), fronted behind a load balancer (ALB). All logs, events and metrics for each service and event is stored centrally in a monitoring and logging tool (CloudWatch). A notification system (SNS) will send out email and IM alerts, and a BI service (QuickSight) allows us to build custom dashboards to measure developer productivity.
Using the best practices learnt from the AWS blog post Why Deployment Requirements are Important When Making Architectural Choices | Amazon Web Services we will segregate the architecture into the three lenses:
Therefore this tutorial has dedicated sections for each of the three lenses of the architecture. Because the DevOps toolset in the Build architecture requires the existence of the ALB and ECS services in the Run architecture, we will start first with the Run architecture, then move onto Build, then the Operate architecture.
This results in the following architecture:
The SDLC that the developers would follow would be as follows:
We aim to make the architecture highly available, by including redundancy in the design, with an active-active configuration over multiple Availability Zones (where each AZ is one or more Data Centers) in a single AWS Region (each Region contains multiple AZs). In the architecture digram above I included 2 AZs for simplicity, but we will actually take advantage of 3 AZs because according to best practice ECS stretches sitself across 3 AZs
As far as the rest of the services are concerned, all the Build architecture services (CodePipeline, CodeBuild, CodeDeploy, CodeCommit), as well as Operate services (CloudWatch, Lambda, S3) are at the Regional level, and not specific to an AZ, which makes all of them natively highly available and redundant. So really the only services that are AZ specific, and which we need to design for High Availability across multiple AZs, is the Load Balancer and EFS file system. This design ensures that our application can survive the failure of an entire AZ.
In addition, you can easily include the CloudFront CDN to cache static content in S3, and bring content closer to the users for latency. You can also include AWS WAF to protect any attacks like SQL injections, and Shield Advanced for further DDoS protection (Shield Basic is included for free on all accounts).
> cat ~/.ssh/configeu-west-2.mkdir ghost-aws
cd ghost-aws
git clone https://github.com/jojo786/ghost-aws-ecs-pipeline.git
> docker run --name ghost -p 80:2368 ghost:latest
Unable to find image 'ghost:latest' locally
latest: Pulling from library/ghostbf
5952930446: Already exist
s3afbf19eb36c: Pull complete
96ad7b697be4: Pull complete.....
[2020-08-13 13:12:19] INFO "GET /assets/built/casper.js?v=bc44039cde" 200 3ms
[2020-08-13 13:12:20] INFO "GET /favicon.ico" 200 4ms
Going to http://localhost/ in your browser will access that container, which the last few lines above showing the GETrequests.
You could choose to not do the port mapping from port on your local machine to 2368 in the container, in which case you can access ghost with http://localhost:2368/
The assumption I am making here is that ghost is storing all content (posts and images) locally in the file structure in the container, using SQLite, and not storing it in a DB. In order to preserve any content across docker images, you can mount a local folder to the image with a volume:
docker run -d --name ghost -p 4431:2368 \ --restart always \-v /home/user/gitwork/ghost-data-v1:/var/lib/ghost/content \ghost:latestIn this part of the architecture we will focus on creating the infrastrcuture to run Ghost, in a highly available manner. In this section, we going to create a VPC with subnets, and security groups. We then going to reference the VPC and subnet IDs when we create an ALB Load Balancer, and ECS cluster.
We will also create an EFS file system to store Ghost data
Let's start off by creating the VPC to house the networking components, e.g. the subnets, which will be used when we deploy ECS and RDS.
Create a VPC with a 10.0.0.0/16 CIDR block.
aws ec2 create-vpc --cidr-block 10.0.0.0/16 --region eu-west-2In the output that's returned, take note of the VPC ID.
{"Vpc": {"VpcId": "vpc-2f09a348", ... }}Using the VPC ID from the previous step, create two subnets with 10.0.1.0/24 and 10.0.2.0/24 CIDR blocks in each availability zone. We will use these for the public subnets.
aws ec2 create-subnet --vpc-id vpc-2f09a348 \
--cidr-block 10.0.1.0/24 \
--availability-zone eu-west-2a \
--region eu-west-2

aws ec2 create-subnet --vpc-id vpc-2f09a348 --cidr-block 10.0.2.0/24 -availability-zone eu-west-2b
Create two additional subnets, that we will use for the private subnets with a 10.0.3.0/24 and 10.0.4.0/24 CIDR blocks in each availability zone.
aws ec2 create-subnet --vpc-id vpc-2f09a348 --cidr-block 10.0.3.0/24 -availability-zone eu-west-2a
aws ec2 create-subnet --vpc-id vpc-2f09a348 --cidr-block 10.0.4.0/24 -availability-zone eu-west-2b
After you've created the VPC and subnets, you can make the first two of the subnets public by attaching an Internet gateway to your VPC, creating a custom route table, and configuring routing for the subnet to the Internet gateway.
Create an Internet gateway.
aws ec2 create-internet-gateway --region eu-west-2In the output that's returned, take note of the Internet gateway ID.
{"InternetGateway": { ... "InternetGatewayId": "igw-1ff7a07b", ... }}Using the ID from the previous step, attach the Internet gateway to your VPC.
aws ec2 attach-internet-gateway --vpc-id vpc-2f09a348 --internet-gateway-id igw-1ff7a07bCreate a custom route table for your VPC.
aws ec2 create-route-table --vpc-id vpc-2f09a348In the output that's returned, take note of the route table ID.
{"RouteTable": { ... "RouteTableId": "rtb-c1c8faa6", ... }}Create a route in the route table that points all traffic (0.0.0.0/0) to the Internet gateway.
aws ec2 create-route --route-table-id rtb-c1c8faa6 --destination-cidr-block 0.0.0.0/0 --gateway-id igw-1ff7a07bThe route table is currently not associated with any subnet. You need to associate it with a subnet in your VPC so that traffic from that subnet is routed to the Internet gateway. First, use the describe-subnets command to get your subnet IDs. You can use the --filter option to return the subnets for your new VPC only, and the --query option to return only the subnet IDs and their CIDR blocks.
aws ec2 describe-subnets --filters "Name=vpc-id,Values=vpc-2f09a348" --query 'Subnets[*].{ID:SubnetId,CIDR:CidrBlock}'Look for the subnet-id associated with 10.0.1.0/24 and 10.0.2.0/24 CIDR block, and associate both with the route-table
aws ec2 associate-route-table  --subnet-id subnet-b46032ec --route-table-id rtb-c1c8faa6
aws ec2 associate-route-table  --subnet-id subnet-a46032fc --route-table-id rtb-c1c8faa6
Here we create and configure a security group (ghost-SG) to allow access to port 80
aws ec2 create-security-group --group-name ghost-SG \
--description "Ghost SG" \
 --vpc-id vpc-2f09a348 --region eu-west-2
Using the group-id of newly-created security group, we allow port 80 traffic, which will be attached to the ALB later on.
aws ec2 authorize-security-group-ingress --group-id sg-04a1a9b583455f819 --protocol tcp --port 80 --cidr 0.0.0.0/0 --region eu-west-2
Using the group-id of newly-created security group, we allow port 2368 traffic, which will be attached to the ALB later on.
aws ec2 authorize-security-group-ingress --group-id sg-04a1a9b583455f819 --protocol tcp --port 80 --cidr 0.0.0.0/0 --region eu-west-2 Elastic Load Balancing supports 3 types of LBs - we will be using an ALB. The ALB will be created across multiple AZs, using one public subnet from each AZ, creating a HA LB configuration.
We will first create the ALB, then create two target groups, then a listener that will bind the ALB to the target groups.
Lets create an internet-facing ALB, using the 2 "SubnetId"s of the public subnets, with a name of ecs-ghost.
Please note down the Arn of the created load balancer, as we will use it later
aws elbv2 create-load-balancer --name ecs-ghost \
--subnets subnet-65abf80c subnet-72f65b3e \
--security-group sg-04a1a9b583455f819 \
--region eu-west-2
Now we will create two target-groups that the ALB will send traffic to, using protocol HTTP and targets of type IP, referencing the "VpcId" from earlier.
aws elbv2 create-target-group --name ghostecstarget1 \--protocol HTTP --port 2368 \--target-type ip \--vpc-id vpc-9d98d1f5 --region eu-west-2

aws elbv2 create-target-group --name ghostecstarget2 \--protocol HTTP --port 2368 /--target-type ip --vpc-id vpc-9d98d1f5 \--region eu-west-2
It is these target groups that ECS services and tasks will bind to when new containers are launched. Please note down the Arn of the target groups, as we will use it later
And lastly, we will create an HTTP listerner on port 80 that references that ARN of the ALB and the ARN of the target group
aws elbv2 create-listener \
--load-balancer-arn arn:aws:elasticloadbalancing:eu-west-2:723215012169:loadbalancer/app/ecs-ghost/7d9f0d07eab1bbec \
--protocol HTTP --port 80 --region eu-west-2 \
--default-actions Type=forward,TargetGroupArn=arn:aws:elasticloadbalancing:eu-west-2:723215012169:targetgroup/ghostecstarget1/4ff4d80c95688591
We now have an ALB created, that will be forwarding traffic to the (not as yet) targets registered in the target groups. These targets will be ECS tasks that we will create next. For now, you can get the DNSName of the ALB, to which you can test out in your browser.
aws elbv2 describe-load-balancers --region eu-west-2

{    "LoadBalancers": [        {            "LoadBalancerArn": "arn:aws:elasticloadbalancing:eu-west-2:132131232312:loadbalancer/app/ecs-ghost/7d9f0d07eab1bbec",            "DNSName": "ecs-ghost-862450218.eu-west-2.elb.amazonaws.com",            "CanonicalHostedZoneId": "ZHURV8PSTC4K8",            "CreatedTime": "2020-07-31T08:44:58.940000+00:00",            "LoadBalancerName": "ecs-ghost",            "Scheme": "internet-facing",            "VpcId": "vpc-9d98d1f5",            "State": {                "Code": "active"            },            "Type": "application",            "AvailabilityZones": [                {                    "ZoneName": "eu-west-2b",                    "SubnetId": "subnet-72f65b3e",                    "LoadBalancerAddresses": []                },                {                    "ZoneName": "eu-west-2a",                    "SubnetId": "subnet-cd50cfb7",                    "LoadBalancerAddresses": []                }            ],            "SecurityGroups": [                "sg-7dda4d19"            ],            "IpAddressType": "ipv4"        }    ]}
Above we can see that our ALB is stretched across 2 AZs, and protected by a security group, which will control traffic into the ALB.
We will create an EFS file system and made it accessible to the ECS tasks.
aws efs create-file-system \
--throughput-mode bursting \
--performance-mode generalPurpose \
--region eu-west-2
Using the file-system-id of the EFS file system above, we will apply a default policy. This policy contains a single rule, which denies any traffic that isn’t secure. The policy does not explicitly grant anyone the ability to mount the file system:
aws efs put-file-system-policy --file-system-id fs-b6702d47 \--region eu-west-2 --policy '{
    "Version": "2012-10-17",
    "Statement": [
        {
            "Effect": "Deny",
            "Principal": {
                "AWS": "*"
            },
            "Action": "*",
            "Condition": {
                "Bool": {
                    "aws:SecureTransport": "false"
                }
            }
        }
    ]
}'
We now configure a security group (efs-SG) that allows in-bound access on port 2049 (the NFS protocol) from the ECS tasks. This will allow ECS to mount the EFS file system
aws ec2 create-security-group --group-name efs-SG \
--description "EFS SG" \
--vpc-id vpc-2f09a348 --region eu-west-2
Using the group-id of newly-created security group, we allow port 2049 (NFS) traffic from the Ghost SG ECS Ghost security group (created previously) referenced by --source-group
aws ec2 authorize-security-group-ingress \
--group-id sg-5345a435435435 \
--protocol tcp --port 2049 \
--source-group sg-04a1a9b583455f819 \
--region eu-west-2 subnet-ids of the private subnets 10.0.3.0/24 and 10.0.4.0/24 and the seceity group if of efs-SGaws efs create-mount-target --file-system-id fs-b6702d47 \--subnet-id subnet-03957fb450fd018e6 \--security-groups sg-0cdf4abb0136e9ac4 \--region eu-west-2aws efs create-access-point --file-system-id fs-b6702d47 \
--posix-user "Uid=1000,Gid=1000" \
--root-directory "Path=/ghost-data,CreationInfo={OwnerUid=1000,OwnerGid=1000,Permissions=755}" \
--region eu-west-2Create an EFS Access Point that maps to the directory /ghost-data
aws efs create-access-point --file-system-id fs-b6702d47 \--posix-user "Uid=1000,Gid=1000" \--root-directory "Path=/ghost-data,CreationInfo={OwnerUid=1000,OwnerGid=1000,Permissions=755}" \--region eu-west-2refer to Part 2 where we talk about the advantage of using access points.
For the rest of the sections, when running the cli commands, please make sure you are in the folder ghost-aws-ecs-pipeline that we cloned, as it contains the files that the cli commands will use.
We will run Ghost as a docker container, so we will need a container platform that will take care of starting, running, monitoring, and moving the containers around. It will also need to make sure there is sufficient containers to cater for the usage - so as usage fluctuates, the container platform will adjust the number of running containers accordingly.
We are also want the Fargate deployment model (rather than EC2 deployment model), which means we dont have to manage any EC2 servers. This is essentially serverless containers. This tutorial will also work almost exactly for the EC2 deployment model if you so choose.
And perhaps most importantly, the container platform will make it easy for us to update new content/code to the containers, making it easy to deploy new changes, will ensuring zero downtime. For these reason, I chose Amazon Elastic Container Service (ECS), as it is very well integrated into the rest of the AWS ecosystem:
I believe, at least for the reasons above, ECS makes a better choice than kubernetes with EKS for our purposes. However, in a follow-up tutorial, I aim to build a CI/CD pipeline for Ghost to EKS.
So at this point, we need to create a service-role, with the correct permissions, that ECS can assume, to talk to other AWS services on our behalf. We will need to create the taskExecRoleforECS role - you can read this and this for additional information.
Use the create-role command to create a role that allows ECS to assume
aws iam create-role --role-name ecsTaskExecutionRole \
--assume-role-policy-document '{
  "Version": "2012-10-17",
  "Statement": [
    {
      "Effect": "Allow",
      "Principal": {
        "Service": "ecs-tasks.amazonaws.com"
      },
      "Action": "sts:AssumeRole"
    }
  ]
}'
Now attach the AmazonECSTaskExecutionRolePolicy permissions policy, that gives the role permission to use ECR
aws iam attach-role-policy \
--policy-arn arn:aws:iam::aws:policy/service-role/AmazonECSTaskExecutionRolePolicy \
--role-name ecsTaskExecutionRole
Now that we have our EFS file system properly configured, we need to make our application aware of it. To do so, we are going to create an IAM role (ecsTaskRole) that grants permissions to map the EFS Access Point
aws iam create-role --role-name ecsTaskRole \
--assume-role-policy-document '{
  "Version": "2012-10-17",
  "Statement": [
    {
      "Effect": "Allow",
      "Principal": {
        "Service": "ecs-tasks.amazonaws.com"
      },
      "Action": "sts:AssumeRole"
    }
  ]
}'
Create a policy, in a file called ecsTaskRolePolicy.json - making sure you properly configure your EFS file system ARN and your EFS Access Point ARN. This policy grants access to that specific access point we have created.
aws iam put-role-policy --role-name ecsTaskRole \
 --policy-name efs-ap-rw \
 --policy-document file://ecsTaskRolePolicy.json
Lets now go ahead and create an ECS cluster, named ghost, in our region (no need to specify AZs, as the cluster will stretch itself across 3 AZs)
aws ecs create-cluster --cluster-name ghost --region eu-west-2With this next command, we’re adding the Fargate capacity providers to our ECS Cluster. Let’s break down each parameter:
--capacity-providers: this is where we pass in our capacity providers that we want enabled on the cluster. Since we do not use EC2 backed ECS tasks, we don’t need to create a cluster capacity provider prior to this. With that said, there are only the two options when using Fargate.--default-capacity-provider-strategy: this is setting a default strategy on the cluster; meaning, if a task or service gets deployed to the cluster without a strategy and launch type set, it will default to this.You could choose to use Fargate Spot, and save upto 70% on costs.
aws ecs put-cluster-capacity-providers --cluster ghost \
--capacity-providers FARGATE \
--default-capacity-provider-strategy \
capacityProvider=FARGATE,weight=1,base=1
In order to run a container in ECS, we need to have 3 things:
This is the task definition we will use for Ghost, saved locally as taskdef.json which specifies:
taskExecRoleforECS that we created earlierghost,2368 as the port ghost listens on,FARGATE launch mode,"executionRoleArn": "arn:aws:iam::1111111111:role/ecsTaskExecutionRole",
"taskRoleArn": "arn:aws:iam::1111111111:role/ecsTaskRole",
"containerDefinitions": [
{
"name": "ghost",
"image": "<IMAGE1_NAME>",
"essential": true,
"portMappings": [
{
"hostPort": 2368,
"protocol": "tcp",
"containerPort": 2368
}
],
"mountPoints": [
{"containerPath": "/var/lib/ghost/content",
"sourceVolume": "efs-server-AP"
}
]
}
],
"requiresCompatibilities": [
"FARGATE"
],
"volumes": [
{"name": "efs-server-AP",
"efsVolumeConfiguration":
{"fileSystemId": "fs-b6702d47",
"transitEncryption": "ENABLED",
"authorizationConfig": {
"accessPointId": "fsap-0e0254e906640402e",
"iam": "ENABLED"
}
}
}
],
"networkMode": "awsvpc",
"cpu": "256",
"memory": "512",
Now that we have created the taskdef.json file locally, we need to register is with ECS:
aws ecs register-task-definition \
--cli-input-json file://taskdef.json \
—region eu-west-2
We now create a service, defined in a JSON file as well, called create-service.json, which references:
ghost-blog:1 task definition created above, with the versionghost ECS clusterGhost SG{
"taskDefinition": "ghost-blog:1",
"cluster": "ghost",
"loadBalancers": [
{
"targetGroupArn": "arn:aws:elasticloadbalancing:eu-west-2:1312321321:targetgroup/ghostecstarget1/4ff4d80c95688591",
"containerName": "ghost",
"containerPort": 2368
}
],
"desiredCount": 2,
"launchType": "FARGATE",
"schedulingStrategy": "REPLICA",
"deploymentController": {
"type": "CODE_DEPLOY"
},
"networkConfiguration": {
"awsvpcConfiguration": {
"subnets": [
"subnet-65abf80c ",
"subnet-72f65b3e",
"subnet-cd50cfb7"
],
"securityGroups": [
"sg-7dda4d19"
],
"assignPublicIp": "ENABLED"
}
}
}
And similarly to the task definition, we now need to create the service with ECS, which we will name ghost-blog, using the create-service.json file above. Please make sure you customise the configs in the file with the
aws ecs create-service --service-name ghost-blog \
--cli-input-json file://create-service.json \
--region eu-west-2
We now going to set-up Application Auto Scaling on the ECS service. In the autoScaling.json file, we specify target tracking scaling policy with a customized metric specification to our ghost-blog service in the ghost cluster. The policy keeps the average utilization of the service at 75 percent, with scale-out and scale-in cooldown periods of 60 seconds.
aws application-autoscaling put-scaling-policy --service-namespace ecs \
--scalable-dimension ecs:service:DesiredCount \
--resource-id service/ghost/ghost-blog \
--policy-name cpu75-target-tracking-scaling-policy --policy-type TargetTrackingScaling \
--target-tracking-scaling-policy-configuration file://autoScaling.json \
--region eu-west-2
As per Tutorial: Create a pipeline with an Amazon ECR source and ECS-to-CodeDeploy deployment, we will later update this line from
image": "ghost",
"to
"image": "<IMAGE1_NAME>"",because the pipeiline will use that placeholder as an output.
We now have linked up most of the different services up thus far:
And now we create the ECR docker image repo, which will be used to store the images we build and push to ECS.
aws ecr create-repository --repository-name ghost —region eu-west-2
The Build lens focusses on achieving deployability for the development team. In this section, we will discuss and deploy the AWS CI/CD tooling, using these AWS services:
There are multiple ways of designing a pipeline. Usually the pipeline will promote code through the different environments: dev → test → QA → prod. There are also different types of deployments: rolling, canary, blue/green. In this post, we are deploying to production only, using a blue/green deployment method. This means that before the pipeline runs, blue is the current production environment. The pipeline will create a new replacement production environment, green, and switch all traffic over. Depending on the timeouts in the pipeline, it will wait a few minutes, and then delete the blue/original environment. So if you picked up a problem early on, during the waiting period, you can simply rollback to the already existing blue environment, which should be very quick. If you picked up a problem later, you do that from scratch with a new push to git.
You will notice that AWS has dedicated and separate services for each function. Other SaaS providers (GitHub, BitBucket, etc) provide a single pipeline service, which is usually just a docker container, in which you run commands for each phase of the SDLC: build, test, deploy, etc. But with AWS building each function/service separately, this allows you flexibility to mix and match services as you require, and not be tied in to a specific service. You could use any git repo, like GitHub and still use CodePipeline, GitHub integrated with CodeBuild, or alternatively use CodeCommit together with other pipeline tools like Jenkins.
This section is based off the official Tutorial: Creating a service using a blue/green deployment. CodeBuild, CodeDeploy and CodePipeline will follow a similiar structure of defining their parameters in a JSON file, then using the AWS CLI to create the config by referring to the file. This is unlike the previous cli commands, like creating the ALB, where all the parameters were specified on the command line as flags.
Let’s start off by creating a CodeCommit git repo. Using the cli, its done with
aws codecommit create-repository --repository-name ghost-blog —region eu-west-2where ghost-blog is the name of your git repo
On your local machine, you should be able to clone that newly created repo:
git clone ssh://git-codecommit.eu-west-2.amazonaws.com/v1/repos/ghost-blogaws iam create-role --role-name CodeBuildServiceRole \
--assume-role-policy-document '{
"Version": "2012-10-17",
"Statement": [
{
"Effect": "Allow",
"Principal": {
"Service": "codebuild.amazonaws.com"
},
"Action": "sts:AssumeRole"
}
]
}'
We now attach policies that provides CodeBuild with the appropriate permissions that is stored in CodeBuildServiceRolePolicyDoc.json file
aws iam put-role-policy --role-name CodeBuildServiceRole \
--policy-name CodeBuildServiceRolePolicy \
--policy-document file://CodeBuildServiceRolePolicyDoc.json
We then create the build project, defined in a JSON file, called codebuild.json, which references:
buildspec.yml file will be used to specify the build commands{
"name": "ghost",
"source": {
"type": "CODECOMMIT",
"location": "git-codecommit.eu-west-2.amazonaws.com/v1/repos/ghost-blog",
"gitCloneDepth": 1,
"gitSubmodulesConfig": {
"fetchSubmodules": false
},
"insecureSsl": false
},
"secondarySources": [],
"sourceVersion": "refs/heads/master",
"secondarySourceVersions": [],
"artifacts": {
"type": "NO_ARTIFACTS"
},
"secondaryArtifacts": [],
"cache": {
"type": "NO_CACHE"
},
"environment": {
"type": "LINUX_CONTAINER",
"image": "aws/codebuild/standard:4.0",
"computeType": "BUILD_GENERAL1_SMALL",
"environmentVariables": [],
"privilegedMode": true,
"imagePullCredentialsType": "CODEBUILD"
},
"serviceRole": "arn:aws:iam::123213213213:role/CodeBuildServiceRole",
"timeoutInMinutes": 60,
"queuedTimeoutInMinutes": 480,
"encryptionKey": "arn:aws:kms:eu-west-2:123213213213:alias/aws/s3",
"tags": [],
"badgeEnabled": false,
"logsConfig": {
"cloudWatchLogs": {
"status": "ENABLED"
},
"s3Logs": {
"status": "DISABLED",
"encryptionDisabled": false
}
}
}
```Using that file, we create a build project with CodeBuild:
aws codebuild create-project \
--cli-input-json file://codebuild.json —region eu-west-2
We start off by creating a role with the required permissions for CodeDeploy to assume
aws iam create-role --role-name CodeDeployECSRole \
--assume-role-policy-document '{
  "Version": "2012-10-17",
  "Statement": [
    {
      "Effect": "Allow",
      "Principal": {
        "Service": "codedeploy.amazonaws.com"
      },
      "Action": "sts:AssumeRole"
    }
  ]
}'
Now attach the AWSCodeDeployRoleForECS permissions policy, that provides CodeDeploy service wide access to perform an ECS blue/green deployment on your behalf
aws iam attach-role-policy \
--policy-arn arn:aws:iam::aws:policy/AWSCodeDeployRoleForECS \
--role-name CodeDeployECSRole
We then need to create a CodeDeploy application, then a deployment group to point to ECS:
The application named, ghost-ecs, will use a JSON file, called codedeploy.json
aws deploy create-application --cli-input-json \
file://codedeploy.json —region eu-west-2
We now define the deployment group in a JSON file, which refers to:
ghost-ecs defined aboveappspec.yaml file -which is by CodeDEploy to determine the ECS task definition{
"applicationName": "ghost-ecs",
"deploymentGroupName": "ghost-ecs",
"deploymentConfigName": "CodeDeployDefault.ECSAllAtOnce",
"serviceRoleArn": "arn:aws:iam::132112111:role/CodeDeployECSRole",
"triggerConfigurations": [],
"alarmConfiguration": {
"enabled": false,
"ignorePollAlarmFailure": false,
"alarms": []
},
"deploymentStyle": {
"deploymentType": "BLUE_GREEN",
"deploymentOption": "WITH_TRAFFIC_CONTROL"
},
"blueGreenDeploymentConfiguration": {
"terminateBlueInstancesOnDeploymentSuccess": {
"action": "TERMINATE",
"terminationWaitTimeInMinutes": 5
},
"deploymentReadyOption": {
"actionOnTimeout": "CONTINUE_DEPLOYMENT",
"waitTimeInMinutes": 0
}
},
"loadBalancerInfo": {
"targetGroupPairInfoList": [
{
"targetGroups": [
{
"name": "ghostecstarget1"
},
{
"name": "ghostecstarget2"
}
],
"prodTrafficRoute": {
"listenerArns": [
"arn:aws:elasticloadbalancing:eu-west-2:723215012169:listener/app/ecs-ghost/7d9f0d07eab1bbec/722f9969e2b206fc"
]
}
}
]
},
"ecsServices": [
{
"serviceName": "ghost-blog",
"clusterName": "ghost"
}
]
}
```Using this definition in the file, we create the deployment group:
aws deploy create-deployment-group --cli-input-json \
file://codedeploymentgroup.json —region eu-west-2
There are many ways to design and define how the pipeline works. I have chosen to split it into two separate pipelines:
There are many ways to optimise and extend the pipeline:
Similiar to what we did with above, we start first with the IAM roles that provide CodePipe with appropriate access to other AWS resources
aws iam create-role --role-name CodeBuildServiceRole \
--assume-role-policy-document '{
  "Version": "2012-10-17",
  "Statement": [
    {
      "Effect": "Allow",
      "Principal": {
            "Service": "codepipline.amazonaws.com"
      },
      "Action": "sts:AssumeRole"
    }
  ]
}'
We now attach policies that provides CodePipeline with the appropriate permissions that is stored in codePipelineServiceRolePolicyDoc.json file
aws iam put-role-policy --role-name CodePipelineServiceRole \
--policy-name CodeBuildServiceRolePolicy \
--policy-document file://codePipelineServiceRolePolicyDoc.json
We again define the parameters for our pipeline in a JSON file, then use the cli to create it. Lets start with the first pipeline, which is focussed on building the Ghost image and pushing it to ECR. The main variables defined in codepipeline-1-commit-build-ecr.json are
ARN of the CodePipelineServiceRoleSo using this command, we can create the first pipeline
aws codepipeline create-pipeline --cli-input-json \
file://codepipeline-1-commit-build-ecr.json —region eu-west-2
And similarly, we will create the second pipeline using the parameters specified in codepipeline-2-deploy-ecs.json
ARN of the CodePipelineServiceRoleaws codepipeline create-pipeline --cli-input-json \
file://codepipeline-2-deploy-ecs.json —region eu-west-2
The Operate lens focusses on achieving Observability, which is about receiving feedback on the state of the application, as well as stats on developer productivity.
CloudWatch Container Insights collects, aggregates, and summarizes metrics and logs from your containerized applications and microservices. The metrics include utilization for resources such as CPU, memory, disk, and network. The metrics are available in CloudWatch automatic dashboards. To enable Container Insights on our cluster, run this command
aws ecs update-cluster-settings --cluster ghost \
--settings name=containerInsights,value=enabled —region eu-west-2
You can now head over to CloudWatch in the AWS console to view Container Insights, as well as to create dashboards that contain our resources, including ALB and VPC Flow Logs.
You can follow this post on how to use Amazon QuickSight as an analytics tool to measure CI/CD metrics.
Execute the following command to enable Container Insights on the cluster. This command will enable Service and Cluster level insights on your ECS cluster
aws ecs update-cluster-settings --cluster ${clustername} --settings name=containerInsights,value=enabled --region ${AWS_REGION}As a base for this post, I used a combination of the following key tutorials in order to build the complete solution of a pipeline for Ghost to ECS:
Whats also worth mentioning, that highlights the rapid pace of innovation at AWS, is the newly launched AWS Copilot, which is a new cli to deploy to ECS, including creation of the required pipelines.